iBUS to Simulator Adapter
Full tutorial on how to connect any FlySky transmitter to a PC wirelessly! 2020-04-10
Preface
Recently, I wanted to try FPV drone simulators, but my radio wouldn't connect to my computer. Then, I stumbled upon a video that showed how to take an iBUS receiver and an arduino to make a simulator adapter. As I already had all the necessary components, I went right to building it.
Below is a video from my YouTube Channel of me building and setting up the adapter:
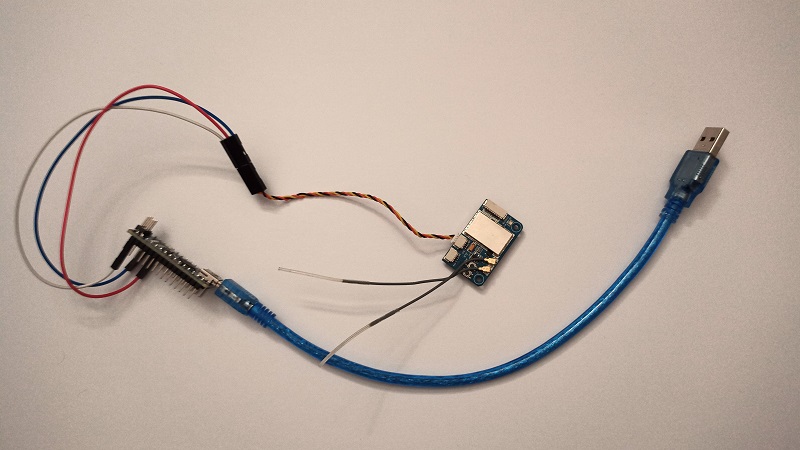
And here's how the finished adapter looks:
How to build it
Here's a full tutorial on how to build this adapter!
First, the parts list. You will need the following:
- A FlySky Transmitter that supports
iBUS - Any arduino board (using the Arduino Nano)
- Any
iBUSreceiver (using the FS i6B) with a servo adapter - 3 Male to Female Jumper cables (using one red, one blue and one white)
- A USB to mini USB cable, to connect the Arduino Nano to a PC
Making the connections is really easy. You need to connect the following things together:
Receiver red wire > red Jumper cable >
5Vpin on the Arduino
Receiver black wire > blue Jumper cable >GNDpin on the Arduino
Receiver yellow wire > white Jumper cable >TX1pin on the Arduino
ArduinoUSBport > USB to mini USB cable >USBport on a PC
Then, upload the Examples > Clear EEPROM code onto the arduino using the Arduino IDE.
After that, if not done already, bind the iBUS receiver to your FlySky transmitter in order to secure the connection.
Finally, download the latest vJoySerialFeeder Software for your operating system.
Once you have set up vJoySerialFeeder with the iBUS protocol, your adapter will work flawlessly!
Conclusion
This adapter is an awesome hack because it allows anyone to use their FlySky iBUS transmitter to try out drone simulators without having to buy an annoying USB cable to connect it to a PC. It was a simple but effective project that is simply really useful!